THE BACK-RANK MATE: HOW IT HAPPENS AND HOW TO STOP IT
The back-rank mate is the first checkmate most players learn and the last one they stop falling for. It ends games between beginners, and it still ends games at club level, usually after a sequence of trades that looked completely routine.
The pattern is simple enough to describe in a sentence, which is exactly why it gets overlooked: nobody thinks their own king is in danger when nothing is attacking it. This guide shows what the pattern looks like, why castled kings are so exposed to it, the three practical ways to defuse it, and how to recognise the tactical setups that force it.
KEY TAKEAWAYS
- A back-rank mate needs three ingredients: a king boxed in by its own pawns, no piece guarding the back rank, and an enemy rook or queen that can reach it.
- Making luft (a flight square, usually with h3/g3 or h6/g6) is the cheapest insurance, and it takes one move.
- As the attacker, look for it every time the opposing rooks come off the board or one defender is doing two jobs.
WHAT THE PATTERN LOOKS LIKE
The "back rank" is the row on which a side's pieces start: the first rank for White, the eighth for Black. A back-rank mate is a check delivered along that row by a rook or queen against a king that has no square to step to, because its own pawns are standing on the row in front of it.
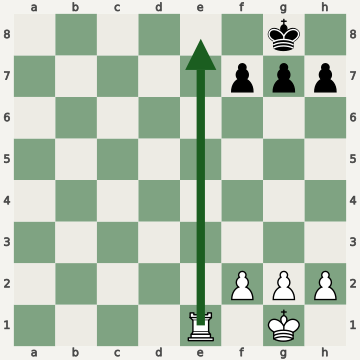
Nothing here is complicated: one rook, three pawns that never moved. The pawns that were meant to protect the king are what trap it. That is the central idea behind the whole pattern, and it explains why the same structure that makes castling attractive (a king tucked behind f, g and h pawns) is also what makes a back-rank mate possible.
WHY CASTLED KINGS ARE SO EXPOSED
After kingside castling, the king stands on g1 (or g8) with three pawns directly in front of it. In the opening and early middlegame those pawns are valuable and you rarely want to move them, so the king has no flight squares at all: the squares in front are blocked by its own pawns, and the squares beside it on the back rank are covered by any enemy rook or queen that gets there. As long as your rooks and queen are around, nobody can exploit this. The danger appears later, when:
- your rooks have been traded off or moved to the other wing, so nothing guards the back rank;
- your queen has gone pawn hunting on the far side of the board;
- a defender is overloaded, meaning one piece is responsible for two things and can only do one;
- you are short of time and stop checking the opponent's rooks entirely.
Notice that none of these require a mistake you would call a blunder in the abstract. Trading a pair of rooks is normal. Winning a pawn with the queen is normal. The mistake is doing either without asking one specific question: after this, does my king have a square to go to?
THE THREE FIXES
1. Make luft
"Luft" is German for air. It means giving your king a flight square by moving one of the pawns in front of it, most often the h-pawn (h3 for White, h6 for Black) or the g-pawn. One pawn move converts a mating threat into an ordinary check that the king can step out of.
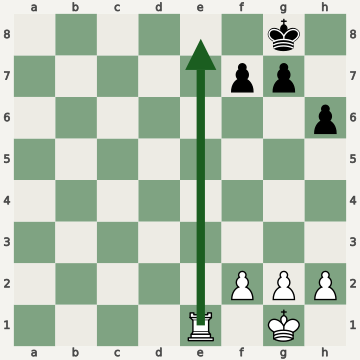
Luft is not free. A pawn on h3 can become a target, and g3 weakens the long diagonal, so the timing matters. A reasonable rule: make luft when the position calms down and before heavy pieces start leaving the back rank, not in the middle of a tactical sequence when every tempo counts.
2. Keep a defender on the back rank
A single rook that stays on the first (or eighth) rank covers the whole row. When you trade rooks, notice which rook you are trading. Giving up the one that guards the back rank, while the other one sits on an open file doing something useful, is how many back-rank losses begin. If you want to double rooks or move one to the seventh rank, consider whether the other still covers your king's row.
3. Keep the checking piece out, or keep a blocker in reserve
The mate only works if an enemy rook or queen can actually reach the back rank. Controlling the open file the rook would use, or keeping a minor piece that can interpose on the back rank, are both valid defences. They are also more expensive than luft, because they tie your pieces down, which is why luft is the default.
SPOTTING IT AS THE ATTACKER
The same pattern is a source of wins when you are on the other side. Look for it when all of these are true: the enemy king is castled with its f, g and h pawns unmoved; the back rank is guarded only by a rook or queen; and you have a rook or queen that can reach the back rank, especially if your own pieces are lined up behind one another on a file.
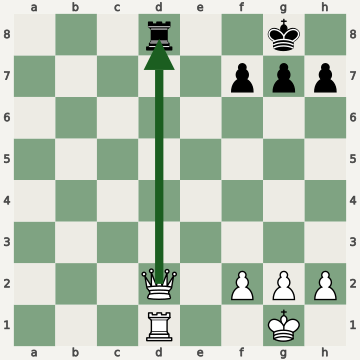
This is the "removing the defender" idea in its simplest form. Black's rook looks like it protects the back rank, but it is attacked twice and defended zero times. The general lesson: before you evaluate a capture on the back rank, count attackers and defenders on that square, and remember that a check along the rank cannot be answered by moving the king if its flight squares are occupied or covered.
WHERE PLAYERS GO WRONG IN PRACTICE
- Automatic rook trades. The recapture feels forced, so the question about your king never gets asked.
- Grabbing a pawn with the queen. The queen was your last guard of the back rank, and it is now on the other side of the board.
- Premoving and time pressure. Online blitz and tournament time scrambles are where back-rank mates happen most, because there is no time for the one-second check.
- Only checking your own king when it is attacked. Back-rank mates arrive from a position where nothing seemed to be attacking anything.
A ONE-SECOND CHECK
You do not need to calculate anything deep to avoid this pattern. Build one habit and apply it before every move that gives up control of the back rank (a rook trade, a rook leaving the first rank, a queen heading away):
- Where is my king's flight square? If there is none, is there a safe pawn move that creates one?
- Who guards my back rank after this move? If the answer is nobody, can the opponent reach it with a check?
- Does the opponent's last move threaten to land a rook or queen on my back rank? A rook lifting to the open file is often the first signal.
Reviewing your own losses is where this habit gets reinforced. If several of your lost games end with a rook or queen check on the back rank, you do not have a tactics problem in general: you have one specific habit to fix. That kind of pattern is hard to see game by game and easy to see across thirty games, which is the reason for keeping a record in the first place.
ChessDiary tags every flagged blunder with a motif, including back rank, so after a few dozen games you can see whether this pattern is actually the one costing you points.
Board diagrams are generated from the positions described in each caption. Piece graphics by Colin M.L. Burnett, used under CC BY-SA 3.0 / GPL via the python-chess library.