CHECKMATE PATTERNS EVERY PLAYER SHOULD KNOW
Strong players do not calculate checkmates from scratch. They recognise a shape: a king in a corner, a knight on the right square, two rooks ready to step forward, and the pattern tells them what the finish is. The calculation then becomes a quick confirmation instead of a search.
This guide shows four patterns that appear regularly in club and tournament games, with a position for each that has been checked against an engine. For each one, notice the same anatomy: a check that cannot be answered, and a king with nowhere to go.
KEY TAKEAWAYS
- Most checkmates fall into a handful of recognisable patterns; learning them turns long calculations into short recognitions.
- Every mating pattern has the same anatomy: the king's flight squares are blocked or covered, and the check cannot be captured or blocked.
- The fastest way to defend is to count your own king's flight squares before the opponent does.
THE ANATOMY OF A MATE
A checkmate requires three things at once. The king is attacked. It cannot capture the attacker, or the attacker is protected. And none of its flight squares is safe, either because they are covered by an enemy piece or occupied by the king's own pieces. If you can count those three conditions, you can find, or avoid, any mate.
Notice that the king's own pieces are usually part of the problem. In the patterns below, the defender's pawns and rook trap the king as effectively as the attacker's pieces do.
SMOTHERED MATE
A smothered mate is delivered by a knight against a king completely surrounded by its own pieces. The knight is the only piece that can give check in this situation, because it jumps over the blockers.
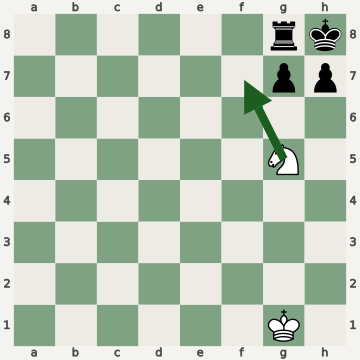
Defensively, the lesson is to give a cornered king room. Moving a pawn so that the king has a flight square, or keeping the rook off the square next to the king, removes the pattern. Offensively, look for it any time the enemy king is in the corner with its own pieces beside it and a knight can reach the checking square. It often arrives after a queen sacrifice that forces the rook to the corner.
THE ARABIAN MATE
The Arabian mate uses a rook and a knight against a king in the corner. The rook gives check on the next rank and the knight both protects the rook and covers the king's escape square.
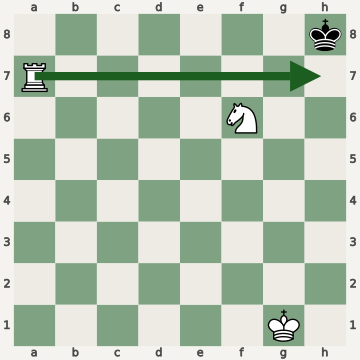
The pattern needs the knight a knight's move from both the rook's checking square and the escape square. When your own king is in the corner, the practical defence is to watch for an enemy knight approaching f6 or f3 (or the mirror squares) when a rook can reach the seventh or second rank.
THE LADDER MATE
Two rooks (or a rook and queen) can checkmate a bare king by taking turns on adjacent ranks, each one cutting off a rank and pushing the king toward the edge. Because the checks "climb" the board like the rungs of a ladder, it is called the ladder or lawnmower mate.
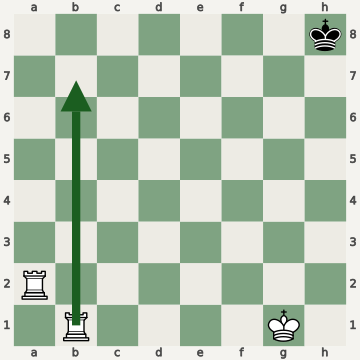
This is the standard way to convert an advantage of two rooks, or rook and queen, in the endgame, and it is worth being able to do it in your sleep, particularly with a clock running. The two checking pieces have to cover adjacent ranks, and they must not be on the same file where one can capture the other.
SCHOLAR'S MATE (AND HOW NOT TO FALL FOR IT)
Scholar's mate is the quickest checkmate that a beginner can fall into: White's queen and bishop team up against the weakest square in Black's position, f7, which only the king defends at the start of the game.
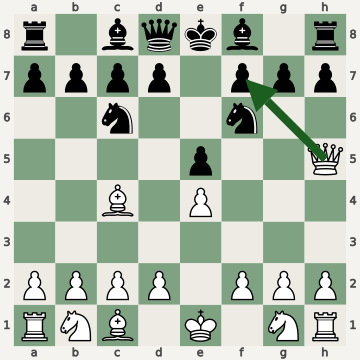
The defences are simple. After 3.Bc4, Black can play ...g6, attacking the queen, or ...Qe7, protecting f7, or ...Nh6 to cover it. More important than the specific move is the habit behind it: before making a developing move, check whether the opponent's last move created a threat on f7 (or f2 for White), and whether your move addresses it.
WHAT TO DO WITH THESE PATTERNS
- Practise recognising the shape. When you replay a game after the fact, pause on any position where a king is cornered and ask which of these shapes it resembles.
- Count flight squares for both kings before any forcing sequence. Your own as well as your opponent's.
- Look for the checking piece first. In every example above, one piece gives the check and the rest of the position exists only to make it unanswerable. Find that piece, and the pattern becomes obvious.
Over the board, you will rarely see an exact copy of any of these positions. What you will see is a half-built version of one, with a king boxed in, a knight a move away from a key square, a rook ready to lift. Recognising the half-built version is the skill that wins the game.
Games that end in checkmate, or nearly do, are the most useful ones to review. ChessDiary's analysis flags the move that allowed the mating pattern, so you can see exactly where the king ran out of room.
Board diagrams are generated from the positions described in each caption. Piece graphics by Colin M.L. Burnett, used under CC BY-SA 3.0 / GPL via the python-chess library.